Our last WordPress How To, where we covered the very basics of setting up a WordPress.org (self-hosted) site, was received well by many of our readers. We’ve received several emails and tweet requests for another WordPress tutorial, based on widgets, sidebars and plugins. We’re listening!
In this article, we’ll be covering sidebars, widgets and plugins to beef up your WordPress blog or site. Keep in mind we’re using self-hosted WordPress for these tutorials; WordPress.com sites are more limited. Most images within this tutorial can be clicked on for a larger version.
WordPress Sidebars
For those that don’t know, a sidebar can be on the left, right or both sides of the page. Where they are depends on your theme. For example, the native Twenty Ten theme (used in this tutorial) has a right side bar. The Thesis theme, which we use on the SEO Article Archive, has options for left, right, or both sides.
When you’re ready to add widgets, don’t be surprised if your theme calls these areas by a name different from this tutorial. Thesis calls the widget areas sidebar 1, sidebar 2, etc.; Twenty Ten calls the widget areas… well, widget areas. Whatever your theme calls them, they all work the same.
There’s a Plugin for That
Plugins come in every shape, size and purpose. Don’t want to worry about pasting code into your code? You have Google Analyticator for that. Need a little help with your SEO? How about Yoast’s WP SEO? Need a way to show ads on the sidebar? Yes, Quick Adsense will help you on your way. WordPress.org has over 13,000 plugins to turn your blog into a mean, lean, marketing machine.
Finding and Installing Your WordPress Plugin
If you need some functionality that isn’t native to WordPress, search for your plugin. There are two ways to do this:
#1 On WordPress.Org
Go to the WordPress Plugin Directory and search for the type of function you need on their site.

Click on a plugin that looks promising and you’ll be taken a page showing the information the plugin developer provided. Before looking at the information, look over to the left-hand side, below the download button.
Here, you’ll see the most important specifications:
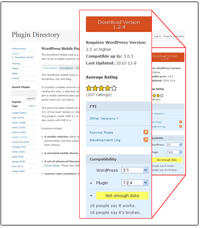
- Is it compatible with your WordPress version (this should be WordPress 3.0+ if you keep it updated)?
- Does it work?
- Are users happy with it? With average rating, don’t just go by the stars… see how many users have actually rated the plugin. Otherwise, you could end up downloading a plugin with 5 stars from one vote that doesn’t perform well.
If all signs are promising, download the plugin to your computer. At this point, you can unzip the plugin file and upload it through FTP or you can sign in to your WordPress dashboard.
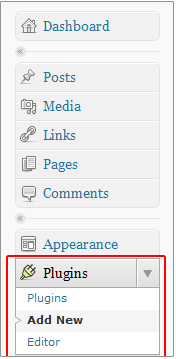
WordPress navigation is always on the left hand side of the administration area. Each part of the navigation has a drop-down panel, but when you first sign in, all panels are closed.
Move your mouse down to Plugins and over the right side of the link. An arrow will appear. Clicking the arrow will show the dropdown. Choose Add New.
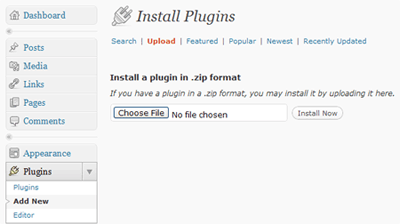
Path: WordPress Navigation > Plugins > Add New
In the upper navigation click Upload and follow the directions to upload your plugin files. Do not unzip the file before trying to install the plugin in this manner; plugins can only be installed this way if they stay in .zip format.
#2 On Your WordPress Site
Depending on your hosting solution, you can upload plugins from within your WordPress dashboard.
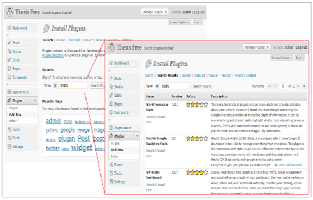
Follow the directions above to get to the Add New page: WordPress Navigation > Plugins > Add New. On the Add New page, with the heading Install Plugins, you’ll see a search bar. Just as you would on the WordPress.org site, search for the type of function you want. Clicking Search Plugins will bring up a list in the order you specified. Once you find a promising plugin, click Details.
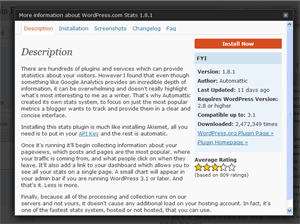
One of the benefits of going through the WordPress dashboard to find plugins is the ability to install directly to your server without having to download the files to your computer. This saves you an extra step if your hosting package allows this action. Again, check the details to make sure the plugin works. If so, click Install Now.
Another benefit is you don’t have to wonder if the plugin is compatible with your WordPress version. If it isn’t compatible, you’ll receive a warning message stating that the plugin hasn’t been tested with your current version of WordPress.
Activating and Using Your WordPress Plugin
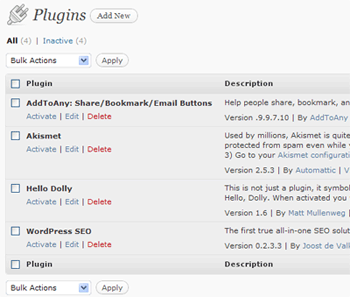
Any time a plugin is correctly installed from within the WordPress dashboard, you’ll have the option to either return to the plugin page or activate the plugin. If plugins are uploaded through FTP you’ll have to activate them through the plugin page, which we’ll do for the purposes of this tutorial.
Path: WordPress Navigation > Plugins

In the upper navigation (directly under the heading Plugins), you’ll initially see All and Inactive. Once you’re actually using plugins, an Active link will also show up. Activating a plugin is easy; simply click Activate on the plugin you want to use.
At this point, what happens deviates, depending on the plugin. We’ve added AddToAny, Yoast WP SEO and Akismet to demonstrate.
Akismet, a spam blocker plugin, adds a configuration link to the Plugins dropdown menu. AddtoAny, a social media plugin, adds a settings link to the WordPress Settings menu (most plugins put something here). On the other hand, Yoast WP SEO adds an entirely different section to the WordPress navigation bar.
If you can’t find your plugin in these areas, search the rest of the main areas along the dashboard (i.e. Posts, Pages, Comments, etc.).
Turning WordPress Plugins into Widgets
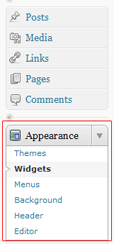
WordPress has two types of plugins: plugins for administrators (only those signed in see them) and plugins for visitors (showing on the front end of the site). Visitor plugins can be managed in the WordPress Widget area.
Path: WordPress Navigation > Appearance > Widgets
Once you’re on the Widgets page, you’ll see a list of all the widgets available to use. Note that your widget area may not look exactly like ours. How many sidebars or widget areas you have available to you depends on your theme.
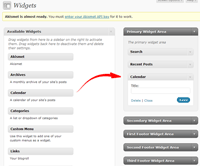
Scroll your mouse over the widgets on the left hand side of the page, and you’ll see a cross show up. Click and drag the widget to the right hand column, dropping it in the sidebar or footer area you want it to show in.
Once the widget is placed, most will automatically open a drop down panel, showing you all available settings for that particular widget. Once you’ve made changes, click save.
Refreshing your site page will show you the results.
A Few Tips about Using Widgets and Plugins
Before we leave you to go off on your own, we have a few tips to pass on:
1. Never install a plugin without looking at the details and checking compatibility first.
2. Some plugins may not be compatible with others; make sure you read the developer’s notes to see if the plugin you want plays well with others.
3. Some plugins may not be compatible with your theme. Although some theme developers have a list of incompatible plugins, yours may not. In this instance, it’s a matter of trial and error; the only way you know a plugin is incompatible is receiving a fatal error warning.
4. Always keep a back up of your database and posts. You can use WP DB Backup for your database, and set a day of the week to export your posts (WordPress Navigation > Tools > Export).
5. If you receive a fatal error and can’t reach your WordPress dashboard (seldom happens, but can), delete the plugin files through FTP. Otherwise, go to the Plugins page and deactivate each plugin until the issue resolves. Generally, this will show you which plugin caused the problem. The other plugins can then be reactivated.
WordPress Plugins We Use and Conclusion
We use quite a few plugins to make managing the SEO Article Archive easier. Some, we’re simply testing out; others, we highly recommend using. Some of them include:
- WP Total Cache – Caches your site for better page speed
- WP DB Backup – Backs up your database each week and sends it to a specified location
- Broken Link Checker – Scans posts and pages for broken links, lists them, and gives options on managing them
- Google XML Sitemaps – Creates a search engine friendly map of your site to be submitted to places like Google Webmaster Tools
What about you? Do you have a plugin you feel is essential for a WordPress site or blog? Do you have a WordPress tutorial you’d like to see? Share your thoughts in the comments!






5 Responses
Hi there,thanks very much for this illustrative tutorial about plugins and widgets.I like to start a blog at WordPress. I have read many posts,but your post explains well how to add plugins to a WP blog. Some WP blogs load faster then others. I want to know how “WP Total Cache ” plugin do this matter.Because some sites have more widgets in sidebar.Though they load fast. Thanks again for sharing these information.
Thanks for your personal marvelous posting! I truly enjoyed reading it, you’re a great author.I will remember to bookmark your blog and will often come back down the road. I want to encourage yourself to continue your great job, have a nice holiday weekend!
Checking for your last post which redirected me to the homepage, I’ve seen this one. Brilliant. I think I’m going to write about this short tutorial series about WordPress, of course if you allow me. I met people who are afraid of WordPress, I really don’t understand why. You were absolutely right affirming that it is a great platform, not only a blogging one, 🙂
Anyway, your sayings are enlightening for everyone who read them. Thank you Gabriella!
Ciao Rudy, sure WP can be a bit scary but once you get into the back end it’s easy. The beauty is we have been using WP for website too, not just blogs. As, always Rudy love seeing you around these parts. Please feel free to use, link, or send smoke signals our way. 😉 We love the connections!
This is a great tutorial for adding plugins that I’m sure a lot of users new to WordPress installations while be able to learn from. Very in-depth and the graphics to illustrate the points are well-done & add so much value to what would otherwise be completely confusing 😉