When I interviewed for my first agency job a number of years ago, one of the questions I thought might cost me the role was ‘Do you know how to run “test and learns”?’
I had no idea. So I just replied ‘No…but I guess I could learn?’.
Spoiler alert, I did end up getting the job and I have run my fair bit of test and learns in my career – so many I now run trainings on it.
Table of contents
What is SEO Testing?
SEO testing refers to the process of investigating the effect of SEO changes on a variable: clicks, rankings, page speed, anything you consider a metric of interest for the success of your organic strategy.
Testing is vital to figure out what works for your audience and for a number of other reasons, especially in this time of change. If you want to know why I do it, and why you should too, I made a few very compelling arguments in my previous article .
In this one, we are going to cover how to test SEO initiatives, especially when you don’t have a dedicated team or tools to do so. Specifically, we are going to see:
- How to formulate a hypothesis
- How to choose the right test design
- How to select test and control groups
- How to extract and analyse data
- How to report on your findings to take action
Let’s dive right in.
Formulating a hypothesis
What is a hypothesis?
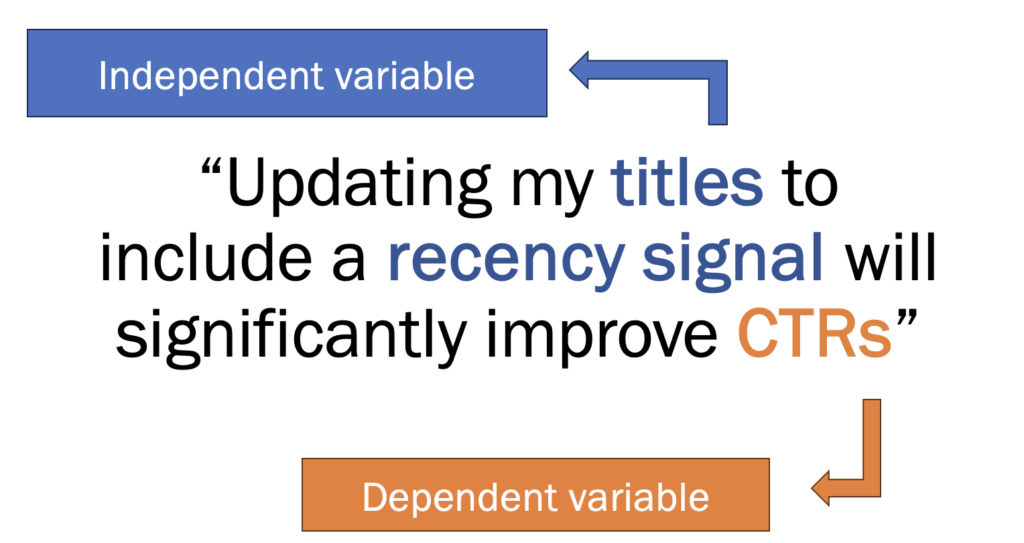
The first thing to do when you plan a test is to formulate a hypothesis, namely the statement that you wish to prove true.
For example, your hypothesis could be that changing a title tag will lead to higher CTRs. This could be proven true by the test, with better CTRs resulting from your title change over time, or falsified by it, if you were to see no change or worse CTRs instead.
What elements should you include in a hypothesis?
Your hypothesis should state the independent variable and the dependent variable at a minimum. The independent variable is the change, or treatment, you plan to test (for example, updating your titles to include a certain freshness element); the dependent variable is the metric you expect to see an impact on, as a result of the test (e.g. the CTR values, or the number of clicks).
Other optional elements you might want to include in your hypothesis are:
- The expected quantifiable impact of the change on the dependent variable (e.g. “the test will improve CTRs by 10%”)
- The timeframe you expect to see significant changes in (e.g. “the test will improve CTRs by 10% over a period of two weeks”)
The more specific the hypothesis, the cleanest directions and results you will have.
How do you start formulating a hypothesis?
Every hypothesis should arise from the questions you are trying to answer in your day-to-day job, and the challenges that your business might be facing.
For example, your challenge may be that you’re not getting enough traffic to a certain portion of the website, or that you are not getting as many sign-ups to a service as you expect.
The metric stated as a dependent variable is an easy one to figure out, because it is most likely what your stakeholders are giving you a hard time about. My personal advice is to look at what is dropping in performance metric, but also at improvements you could be making based on tech audits with crawlers like Screaming Frog or Sitebulb, and prioritise your test ideas based on what’s most likely to make an impact to the business.
Some of these questions might look like:
- If my conversions are down, can UGC content on the product page help lift the sales up?
- Can I achieve better rankings to product listing pages by adding them to the main navigation?
- Does human or AI-generated content perform better on blog pages?
These sorts of questions will guide you through developing your hypothesis, and some of them might even make a case for a product feature.
However, if you’re running low on ideas on what you want to test, the teams at SearchPilot and seoClarity have a series of blog articles and newsletters that are great for inspiration.
Choosing the right test design
Once you formulate your hypothesis, you are ready to select the test design that is most suited to your test. The most popular tests in SEO are:
- Time-based tests (or pre/posts), where we compare the performance of a page or group of pages against their previous performance.
- Split-tests, which compare two different sets of pages against each other in the same timeframe. Split tests can further be distinguished in A/B tests and multivariate tests, depending on how many variants we are testing in the same timeframe. These kinds of tests normally require a higher traffic threshold than time/based tests, to be able to infer some significance on the results.
It’s also worth noting that SEO split testing tends to differ from their usual definition in other domains like UX and CRO. The main difference is that SEO A/B and multivariate tests split pages in different groups rather than users into different buckets to randomly assign to one version of the page or the other (although there are tools that can do this, and it likely makes sense if you’re testing something that is lower down the funnel and requires user action).
The table below can help you understand the different traffic requirements between these three test designs:

While existing traffic and timeline available to test can direct you towards one of these test design, a couple more things that will help you make the right choice are:
- The variables you have chosen to test: are you testing one single change, or do you want to test more at the same time?
- The tools you have available to implement the treatment: are you doing client-side changes, or are you going server-side?
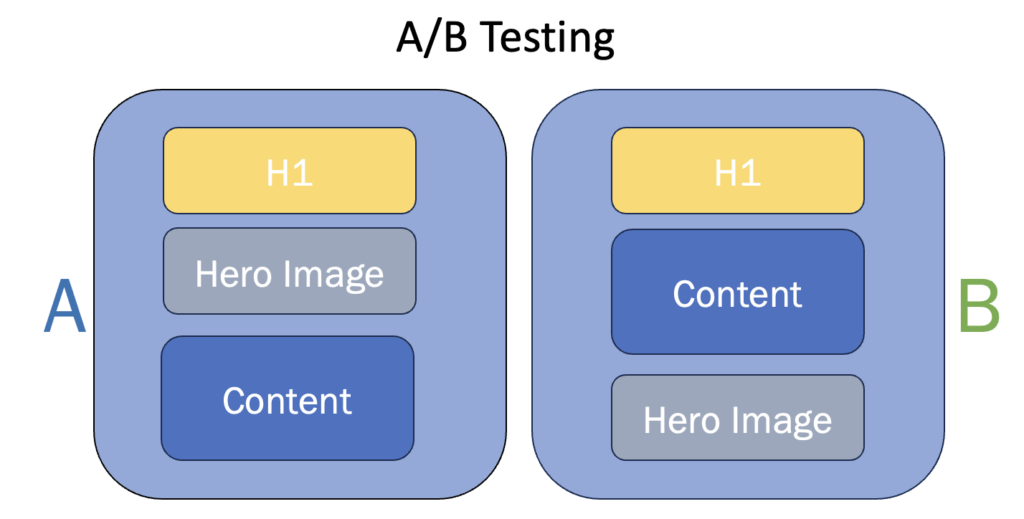
A/B tests
In SEO, this is when we test a change on a set of pages against a control group, and we check the results between the two groups at the same time.
The main concept of A/B testing is that you test your variable of interest across two groups in the same timeframe, so that all of the other factors are controlled for.
Example scenario: we change the placement of content on the product page for 100 test pages today (group A). In 4 weeks, we’ll compare their impressions, CTRs, clicks and average position against a group of 100 control pages that did not get content moved (group B).
Multivariate tests:
Think about them as A/B tests on steroids.
The principles are the same, but instead of testing one particular variable at a time, you test many at the same time.
If we take the scenario above, this could mean that you decide to test not only the different content placement, but also a different content type at the same time. Note that you will need a group for every variant, to better control for the potential impact of each change.
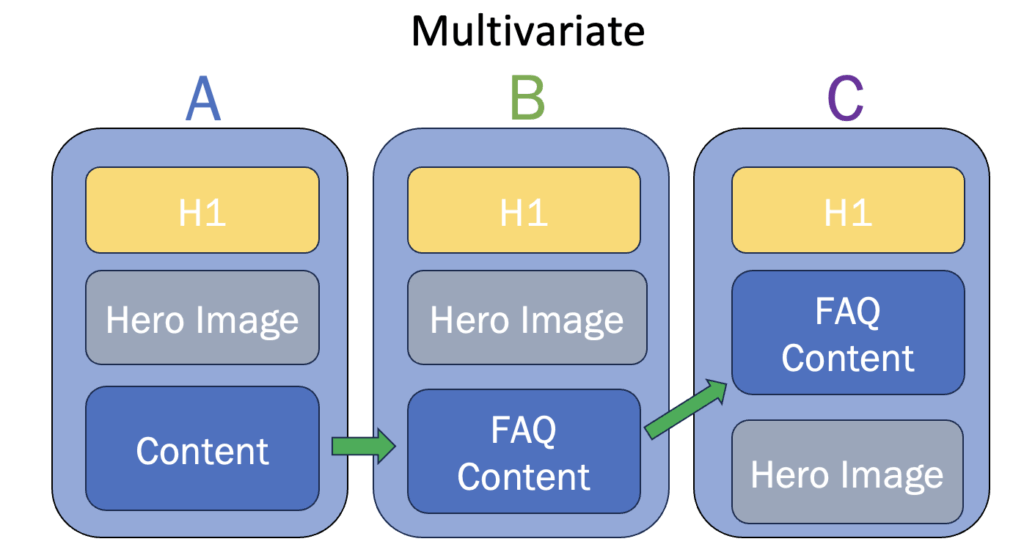
Multivariate testing, contrary to traditional A/B testing, needs to be done with a sizable amount of traffic to make sure you will have significant results rather than obtained by chance, so that you can draw some reliable conclusions based on what you observe.
Time-based (Pre-Post)
If split tests compare performance across two or more groups with a different (or no) treatment, time-based tests compare the performance of a group against itself prior to the change.

This one is something I tend to use a lot, as it is the most flexible in terms of traffic and variant control requirements, so it can be a good testing ground even for smaller websites.
So if I decide to switch up the content on a page (or group of pages) today, in a month I can check back and see if that brought any lifts in performance in the same set of pages, as compared to before I did the change.
Selecting Test and Control Groups
Once you’ve set on a test design, you will need to choose what pages you’re actually going to run the test on.
Ideally, you will have two groups:
- Your test group, which is made up of the pages where you are going to apply the change
- Your control group, made up of similar pages that stayed the same and act as a comparison.
Even if you are running time-based tests and you’re already technically comparing against the test group’s previous performance, you can still have a control group, provided there are any pages that can act as a satisfactory comparison. That helps you to see clearer patterns in the results.
How do you select a test group?
Your hypothesis should already inform what pages it makes most sense to test, based both on what drives the change you want to implement and the type of treatment we want to apply.
For example, if your challenge has been traffic dropping on product listing pages (PLPs), those are exactly the pages where you want to test a change that can improve the performance. My suggestions to choose the test group boil down to the following:
- Take pages with enough traffic
- Avoid including your outliers (like your most viewed page or one that doesn’t have any traffic at all)
- Choose pages of the same type: try not to lump together PLPs, product pages and blog pages, because they normally don’t share the same intent, stage of the funnel or design, making it difficult to attribute the result of your test only to the change you made.
These precautions help you reach a conclusion with a certain degree of confidence, in the event you were to see a significant change from your test. This is helpful to make informed decisions, especially when you want to extend the change to more pages, based on the results you have obtained.
How do you select a control group?
There’s an easy rule of thumb I use to select control groups: try to keep them as close as possible to your test groups, so that everything is comparable.
Below are a few options that I normally use, sometimes even together.
- Same page types as the test group, with similar traffic across the last year.
Put together a larger sample than what you intend to use as your test group, get the traffic for the last few months (depending on how much your industry is affected by seasonality) and then randomise the sample into two groups of similar traffic.

You can ask any LLMs to do the randomisation for you (just remember not to feed it with your actual domain and proprietary data, but to use an alias if you’re going the ChatGPT route); otherwise, I use R Studio to help me out with randomisation. You can find more info on how to do it here.
- The same group of pages as the test in a different market that didn’t get the treatment.
This is ideal if you have an international website and if you’re planning to scale up to other locales. Naturally, you will have to make sure you account for different holidays and cultural events that might impact the data in the same timeframe, but it is in general the pages will be comparable.

- The overall website trend across the same dates.
This might not work with smaller websites because it would be heavily influenced by the test group performance, if there’s any change; however, with big websites, checking against the general site performance helps see the impact in those cases where it might not be immediately easy to detect because the trend is down across all pages; and, on the other hand, it might strengthen your results when the overall trend is down, but the test group performance is up.
How long should you run the test?
It depends on your existing traffic and type of change.
I always try to leave two or four weeks if it’s an SEO test, and I will count the first day of the test as the one when changes have been crawled rather than implemented, because then you can be sure that Google has seen it and it’s a true representation of your changes (for small sites, there might be a difference and you might have to trigger a recrawl). You can see if the change has been rendered by leveraging any crawler you are already familiar with, or using the Google URL inspection tool to see the live tested page (URL Inspection → Input the URL in the bar on top of the page → Test Live URL button → View Tested Page).
Additionally, I always run intermediate check-ins after a week, which allow me to catch anything that might have gone horribly wrong and revert the change. If you can build a LookerStudio live dashboard containing your test URLs, then it’s even easier to spot anything even before the official check-in dates.
Extracting performance data
Test design and resources will determine what you use to extract data, but here are my favourite free tools to extract my performance data:
- Google Search Console (easiest, but data is sampled and you might have regex limitations)
- Search Analytics for Sheets Chrome extension (easy, brings back more data than GSC)
- BigQuery (better control on segmentation)
With any of these tools, you will need to segment data to include only the URLs in your test and control groups. To do so, you can use regex formulas to filter out only the data you are interested in.
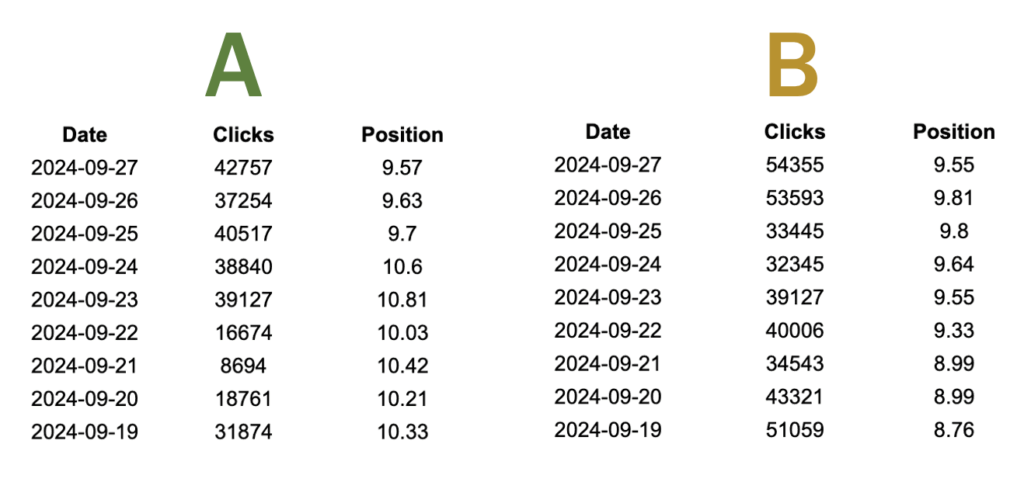
Below is an example of how I filter only the URLs of my test group (in this case they all share the structure https://domain.com/c:[number] ) from Search Analytics for Sheets, using regex:

And then I group by “Date” so that the cumulative clicks, impressions and average CTRs and position for the group I am extracting can be brought back in a timeline.


If you want to learn more about regex for SEO, I recommend reading these:
- A guide to RegEx for SEOs by Myriam Jessier and Chloe Smith
- RegEx for Google Search Console by Jean-Christophe Chouinard
- How to get the most out of the Google Search Console API using RegEx by Angel Niñofranco
AutoRegex is a great free tool that allows you to build regex formulas just by inputting in plain English what you want to get out of it (bear in mind that GSC uses Re2 syntax, so you will have to specify this in your prompt).
Also, Regex101 is where you can validate all your regex attempts to make sure you are targeting the correct URLs.
Depending on your design, you can run this process for all the groups of interest (test and control groups), until you have an export that looks like this for all of them:
Bonus tip: whenever you have these exports, always throw an eye to the raw data, to make sure there are no artifacts, missed rows or huge blips that might be originated by bot traffic, as that will make your analysis less reliable.
Analysing the data
There are two ways to go about it, if you’re running solo (aka no tools or team).
- Use delta formulas to compare performance across timelines and groups.
The two below bring exactly the same results back, so you can choose either:
- [(sum/average of metric post test) / (sum/average of metric pre test)-1]*100
- [(sum/average of metric post test) – (sum/average of metric pre test)/ (sum/average of metric pre test)]*100

- Use Causal Impact analysis to establish impact as compared to no treatment condition
It sounds really daunting and it can look just as scary, but I wrote a step-by-step guide on the WTS Knowledge Hub, and I have an entire folder of people who have found it helpful and now use it on the regular.
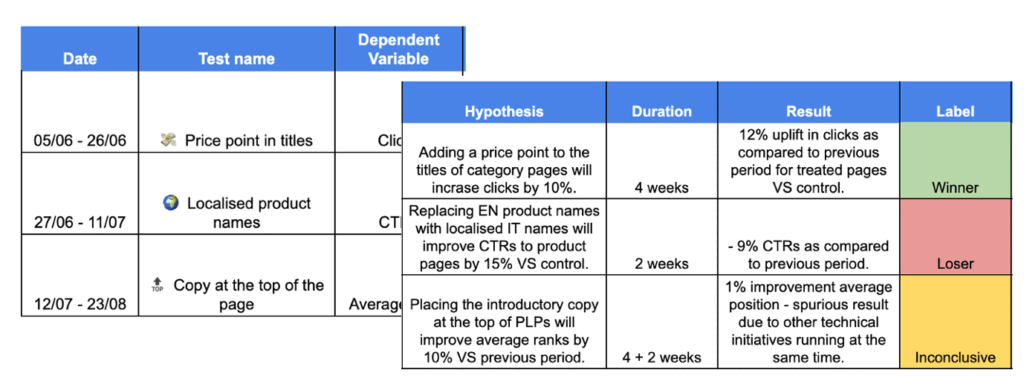
Reporting on what matters
The majority of us (and for sure the people sitting across the boardroom) respond to storytelling rather than decontextualised numbers.
So when you report on your test, make sure that, along with a simple visual, you provide a top level summary that concisely describes the following:
- Your hypothesis (what you wanted to test)
- The groups & treatment of the test (the pages you tested)
- When the test was launched and any dates of analysis
- The results and the classification based on it (e.g. is it a winner or a loser?)
- The next steps
While the first four elements help convey context and replicability for yourself or another team that might want to run similar tests again, the next steps are the most important part for your stakeholders, as it tells them exactly what they can expect in terms of strategy tweaks and business impact.
I have a template that you can access here, but here’s what my summaries normally look like:

And finally, do your future self a favour and create a repository for the tests you did: this will keep a record of your direction and of the learnings for each market, so you can keep refining the strategy and get to know even more about your customers.
Bonus tip: keep a living document to keep track of algo changes, engineering releases and cultural holidays (or any other external events) that could have an impact on any of the tests you are running, so that you can always refer back to it, if you notice something unusual.
What do you do after testing?
As much as you might end up loving running tests, you shouldn’t do it just for the sake of it, but to find actions to deliver for the success of your business.
Some rules of thumbs depending on the results:
- If a test is a winner (you see a significant lift in the metric of interest), it normally makes a case for scaling the change to bigger groups of URLs. In this case, your dependencies will inform who you need to speak to if you can’t scale the change on your own. Find your devs, befriend them and speak their language (e.g. create user stories on Jira).
- If the test is a loser (meaning you see a decline in the metric of interest), it’s best to revert the change to prevent further losses.
- If the test is inconclusive (no movement in the metric of interest), you can let it run a little longer before archiving it, or test with bigger/different groups to see any trends.
Especially for enterprise websites and clients, not every successful test will see the light of day in production. So in order to decide what battles to fight, prioritise your actions based on estimated effort and business impact.

Change is always scary. Testing gives you the confidence to advocate for the changes you believe in, with data that can back you up. And when you start sharing the results transparently, you get more people excited about the mission.
So stay curious, keep testing and, most of all, learning new things about your audience, so you can consistently be the candidate that offers exactly what they are looking for at every stage of their journey.